Showing posts with label Embossing. Show all posts

February 10, 2012

A LITTLE BIT OF SCRAPPY LOVE

WHOOHOO!! It's Friday!! I love Fridays because that means no homework, no practice, AND lots of stamping :-)  I actually have two workshops in the next two days - one tonight, and one tomorrow! I am excited because that means stamping with new friends and seeing some old friends :-) I just love getting together to make pretty things, it's the best part of my job! Heck, every part of my job is amazing :-) I also hope to get some scrapbooking done this weekend as I have not been able to do much lately and I miss it!  I did get a chance to one layout and I wanted to share it with you today! It is one of my daughter and her very close friend Sam - these two girls are glued at the hips, but they are so much fun together! I have never heard so much laughter, they make me smile every time they are here at the house together :-) I used a lot of new products on this page, and I love the way it turned out! I wanted something soft and pretty, and that is what I got! Not a whole lot of stamping going on with this page, but the sentiment is one that makes me smile every time I see it - "Friend Good" by Frankenstein! LOL - it is part of a set called Smarty Pants, and I hope it never retires, it is one of my all time favorites!!
Oh, but look at that beautiful patterned paper!!! Isn't it just gorgeous??!! It is from the Gorgeous suite of papers called Attic Boutique and is in the Occasions Mini. I just love all the patterns and color combos in this pack, it is all soooo very pretty and definitely has the vintage touches that I love!  The pretty details of each pattern make this an ideal suite to use for all kinds of projects - and I have *giggle*. The strip across the bottom of the page is also from the same suite, it's just the flip side of the pattern used on the main strip. It is mounted on Melon Mambo card stock, which I border punched along the bottom with the Pinking Hearts border punch! I often forget I have this punch, and it is an awesome punch, I just love the little hearts border it makes!
Ooh, and look at that pretty birdie!!  Sorry for the shadow, I had a heck of a time with this close-up, lol! However, you can see enough details to know that his is a gorgeous die, and so much fun to play with! I cut the body out of another piece of the Attic Boutique suite, and the wing is Regal Rose Card Stock. See how the wing has some beautiful texture? That's because I ran it through my crimper and oh, I just love how it looks!!!
I added some pretty ribbon (whisper white) and one of the new buttons from the mini from the Twitterpated suite - I love how super cute they are and you get tons of them in different shapes and designs in two different colors! 48 buttons for $6.95 is a heck of a deal :-) I also used a couple more buttons on the bottom right hand side of the page - aren't they just so pretty??!  Most of my little embellishments on this layout are actually dies for the Big Shot - I use my Big Shot every day and I honestly have no idea what I would do without it! So many fun new dies, and embossing tools - I have lots of fun mixing and matching and just playing around with them!
See the hearts? They are so cute, and I actually used two different embosslits to cut these. One is called Scalloped Heart of Hearts and is actually the bigger hearts at the top of the page - soooo very pretty!  I love the textured look at the pretty finished edges it creates. The smaller hearts are from the brand new embosslit in the Occasions Mini called Fashionable Hearts and it has different sizes and patterns for these hearts. You can see them scattered on the page and the close-up of one in this picture. I actually used that heart to cover up the camera that my daughter is holding since they took that picture while looking in the mirror at themselves - ROFL! Silly girls, right??!

Embosslits are fun and easy to use, and at $11.95, they are a great deal to boot!  I really love that our new embosslit has so many different patterns and sizes to choose from because it gives you an instant variety to your embellishments, especially when you mix and match papers and colors to cut them out with! Super cute! Another one of our new products that I used on this layout is our new frame designs. I used the Labels Framelits for the sentiment pieces and I love them! They all nest together so well, and you can use both the negative pieces (just the outline) or the whole shape like I did here! The great thing about these frames is they also coordinate with one of our new stamp sets called Apothecary Art, and, although I did not use it here, I have played with that as well, and it makes cutting out those shapes quick and easy.  I love this layout and now I have decided I need to make a matching page so that both sides of my book are complete, lol! I like double layouts, it keeps all my books looking pretty :-)  So, hopefully I will have time to do that this weekend and I can share it later on next week! If you like any of the products that you see here, you can buy them in my online store, or you can email me your order and I will be happy to place it for you! Don't forget: with every $50 you spend, you get something FREE from the Sale-a-Bration brochure and you don't want to miss out on that!! I love FREE, don't you??!!  Now, I am off to do the last minute prep for my workshop tonight, and hopefully do a little stamping before it is time to go! The kids both have plans tonight, and Tony is enjoying a golf weekend with his buddies down South so it is just me and the dogs! Enjoy your weekend and don't forget to take some creative time for yourself!!
Layout Recipe:
Paper - Regal Rose, Soft Suede, Melon Mambo card stock, Attic Boutique Designer Series Paper
Inks - Soft Sued classic stamp pad and stampin' write marker
Stamps - Smarty Pants
Tools - Big Shot, Labels Framelits, Fashionable Hearts embosslit, Heart of Hearts embosslit, Elegant Bird Bigz Die, Crimper, Pinking Hearts border punch, Scallop Trim border punch, dimensionals
Accessories - Whisper White thin grosgrain ribbon, Twitterpated buttons, Basic Rhinestones

February 9, 2012

PSSSSTTTTT...........LOVE YOU! :-)

Happy Thursday stampers!!! It is a beautiful day here in Northern California - I swear, winter is skipping us completely this year! It is like a Spring day out there, full of sunshine and already feeling warm :-) I don't really mind, I happen to not be a huge fan of winter, lol!! So, I am planning on spending at least a little time outdoors today so I can soak up some sun! I will probably take a stamp project out to the patio and enjoy the weather AND some stamping :-) I plan on getting a lot of stamping done over the next five days as my husband is leaving for a long weekend golfing trip with one of his best friends. I will miss him BUT that DOES mean I can hang out in my stamp room for hours and hours without feeling guilty - the kids have their own lives, so that is what I am going to do, lol! Today I want to share another sweet card that I made using the PS I Love You set from the Occasions Mini catalog.
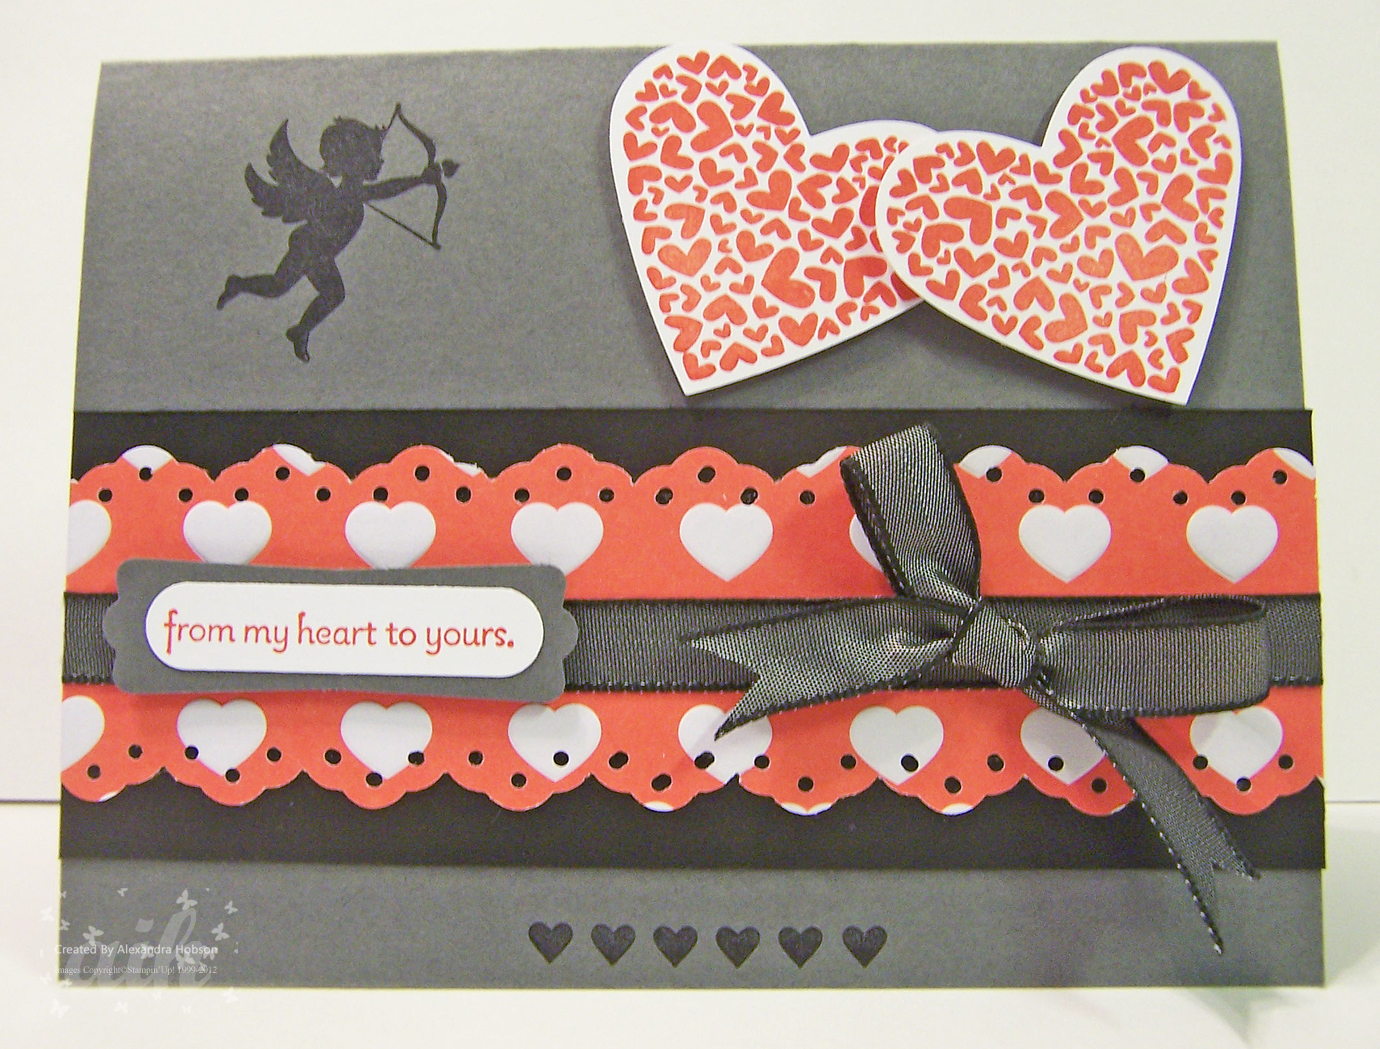
I totally love that little Cupid stamp in this set, and seem to use it a LOT :-) You have to admit, he IS cute, lol! This is a card I actually made for my husband to celebrate a special day of ours in January. Our official anniversary is in May, but we do have one in January that is just ours *wink* so this is what I gave to him. It is simple but pretty without being too frilly. I used some greys and blacks to make it a little more masculine, but I could not resist using a little bit of ribbon too!  I also did a bit of embossing - the hearts were stamped in Calypso Coral ink and then I used my Versamark Pen and clear embossing powder to make them all shiny and purdy :-) I also love this heart image because I can punch them out using the Full Heart Punch - makes is so very easy! The sentiment is also from this same stamp set - in fact, this is one of my favorite stamp sets because it has so many sentiments to choose from!  The little hearts along the bottom of the card are a really fun border stamp, I love the little accent it provides here!
I also used some of the fabulous embossed patterned paper from the Sweet Shop series, also in the Occasions Mini. Such fun papers - not really a traditional Valentines or Anniversary paper, but these hearts are puffy and oh so cute, so I decided that for this card, it would be, heeheee! There are some really cute and fun papers in this set, and a couple of the others patterns are also embossed, making them really fun to use! I see an ice cream social in my future class schedule using this same paper *wink*  Like I said, a pretty simple little card, but he loved it and that is what matters to ME :-) If you like the products you see here, you can purchase them in my online store or email me your order and I will be happy to put it in for you! Don't forget: since it is SALE-A-BRATION time right now, for every $50 order, you get to choose something from the SALE-A-BRATION catalog FREE!! I love FREE, don't you?? *wink* I am off to soak up some sun, drink some more coffee, and STAMP!! Have a fabulous day, and remember to take some time to be creative :-)
Card Recipe:
Paper - Basic Gray, Basic Black, Whisper White card stock, Sweet Shop Designer Series Paper
Inks - Basic Black, Calypso Coral ink pads, Versamark Pen
Stamps - PS I Love You
Tools - Eyelet Border Punch, Word Window Punch, Modern Label Punch, Clear Embossing Powder, Heat Gun, Dimensionals
Accessories - Basic Black Taffeta Ribbon

February 6, 2012

TAKE IT TO HEART WOW! SWAP

Happy Monday stampers! I hope you all had as fabulous a weekend as I did :-) I spent the weekend hanging out with my husband - first time in a looonnnngggg time we have both had some downtime on a weekend! Saturday we just lazed around and then went out to dinner, and then yesterday we went over to my in-laws for the game and some yummy food! Really had a nice weekend.....but now, it is back to the work week and I have lots to do! However, since I have one of the funnest jobs around, I can't complain too much *wink* Today I want to share with you the card I made for my WOW! swap during Leadership. My group decided to have an organized swap of our own, and I am so very glad I participated because this is one amazingly talented group of stampers - their cards are all BEAUTIFUL! This was my take on a WOW! swap, and I was really happy with how it turned out! Lots of different products on this one, I was having a blast playing with all my stuff, lol!
The stamp set I chose to use is the uber cute set from the Occasions Mini called Take It To Heart. I love this set because the heart images coordinate with our new Framelits Hearts collection making is super easy to cut the hearts out! I love all the detail that you can see on these images, makes them really fun to color in, or you can emboss the image like I did and give it that extra WOW! look. I used  Cherry Cobbler embossing powder and stamped my image on the Naturals White card stock because I like the more natural look of this paper. I did not cut the heart out on the Big Shot until I had done all the stamping and embossing. Soooo easy to just line up the image with one of the framelits, run it through, and BAM! instant heart image for my card :-)  The patterned paper is from the Twitterpated paper pack, also in the Occasions Mini - love this paper!! I cut it out using the other set of framelits we have - have to try them all out, right??! The heart image is mounted on a 3 inch circle that was cut out on the Big Shot and then embossed using the Perfect Polka Dots embossing folder. The background of  this card is actually stamped as well, but might be hard for you to see here since it is Crumb Cake ink stamped on Crumb Cake card stock. I used the Parlor Prints background stamp. The ribbon is some of the new Blushing Bride pleated ribbon and oh, it is so yummy!!! The sentiment is actually from another stamp set in the mini called PS I Love You - I love all the fun sentiments in that set! I hope you like my take on what a WOW! swap is - I sure had fun making it *wink* If you like the products you see here and want to purchase them, you can do so in my online store and remember, SALE-A-BRATION is going on so for every $50 you spend, you get FREE things too!! I love FREE, don't you??!! If you would rather email me your order, I am happy to put it in for you! Now, I am off to the stamp room to get some fun things done for my upcoming classes and workshops. If you would like to take one of my classes, you can check out my class listing on my website - I would love to see you!!! Have a fabulous day and don't forget to take some time out to be creative :-)
Card Recipe:
Paper - Crumb Cake, Blushing Bride, Early Espresso, Pool Party, Naturals White card stock, Twitterpated Designer Series paper
Inks - Versamark, Crumb Cake, Cherry Cobbler stampin' inks
Stamps - Take it To Heart, Parlor Prints(background), PS I Love You (sentiment)
Tools - Big Shot, Framelits (hearts and labels collections), Perfect Polka Dots and Square Lattice embossing folders, 3 inch Circle Die, Modern Label punch, Adorning Accents Edgelit Die, Heat Gun, Dimensionals
Accessories - Pool Party Seam Binding Ribbon, Basic Pearls, Blushing Bride pleated ribbon
 

January 13, 2012

LEADERSHIP SWAPPING!

Happy Friday!!! I for one am super glad it is Friday, this has been a loooonnnnngggg week!!! Plus, my daughter's birthday is this Monday so we have the celebrations starting tonight, lol! Movies, bowling, a formal dance tomorrow night, and then snowboarding on her actual birthday, which is Monday - WHEW! She loves to celebrate HER day heehee!! And then, I LEAVE FOR LEADERSHIP WHOOHOOO!!! I am so very excited -there is nothing like a Stampin' UP! event - they are always amazing!!! I am really looking forward to seeing all my friends, going to fabulous classes, and seeing some wonderful inspiration! YAY! In trying to get ready for Leadership, I have been working on some swaps, which I will be sharing with you over the course of the next week! I am really having fun playing with all the new products in the mini; I have been neglecting some of my other faves this week, but I am sure they will be out and inked up again soon, lol!
This card is made with the set Rue Des Fleurs, and I LOVE LOVE LOVE this set! It has 8 gorgeous stamps, and the sentiments are wonderful and a fun play on words to go with the images. And, it's a steal since you can get the clear set for $23.95! I love the vintage look and feel of this set as well, that is RIGHT up my alley - it makes me smile!! I wanted to make a fun thank-you card so I decided on the corset and the fabulous coordinating sentiment. The corset is stamped in Soft Suede and I just added some touches of Marina Mist with my stampin' marker. The two sentiments are easy to line up with the clear stamps, I just put them both on the same block, one right under the other, and it stamped beautifully! And straight, lol! Notice how pretty the base card is? I used our new Edgelit dies and the coordinating embossing folders to make that beautiful design, and I love them! They instantly add an elegant look to your card! I see a lot of potential with these new dies, and I plan on doing a whole lot of playing with these over the next few weeks, heehee! The Designer Series paper comes from the Twitterpated line of paper and I LOVE it!! Twitterpated is a word I have been using for a long time, and I am not quite sure how it started. I DO know that the word originates from the Disney movie Bambi - do you all remember?? Anyway, I fell in love with this paper pack not only for the name, but for the beautiful, fun patterns it has! The colors are fabulous too! See how well it goes with the yummy Riding Hood Red pleated ribbon? Love this ribbon, so many things you can do with it! And of course I had to add some fun pearls - what good is a corset without pearls? *wink* I had a great time making this card, and I hope my swap ladies like it as well! If you want any of the products you see here, you can purchase them in my online store or email me and I am happy to put your order in for you! Now, I am off to stamp the day away since I got all my "chores" done yesterday! I hope you all have a FABULOUS weekend - and stay tuned for a LEADERSHIP SPECIAL I will be having while I am in San Antonio, you DON'T want to miss out :-) Happy Stampin!
Card Recipe:
Paper - Soft Suede, Marina Mist, Riding Hood Red, Blushing Bride card stock, Twitterpated Designer Series Paper
Inks - Soft Suede, Riding Hood Red classic stamp pads, Marina Mist stampin' write marker
Stamps - Rue Des Fleur
Tools - Big Shot, Edgelit Dies, Edgelit embossing folders, 2 1/2 inch Circle Punch, 2 3/8 inch Scallop Circle punch, Scallop Oval punch, Scallop Trim Border punch, Dimensionals
Accessories - Basic Pearls, Riding Hood Red pleated ribbon, Marina Mist narrow grosgrain ribbon

September 20, 2011

HOLIDAY MINI SPOTLIGHT - DAY TEN

Good morning!!! Today is the last day of my Holiday Mini Spotlight Series!! I hope you have enjoyed the last ten days of posts showcasing the fabulous products the mini has to offer!! I am sure you will see more projects from me using mini products, but I have a lot of other projects brewin' right now too *wink* Today I am going to share a Christmas card that uses several different products from the mini! The image is from the Christmas Lodge stamp set - the images in this set are just beautiful!!! I stamped the image in Always Artichoke CRAFT ink, then added clear embossing powder and embossed it using my heat tool.  I then added some subtle white accents on the edges and the bottom of the tree using my white gel pen!

Here is a closeup so that you can see a little bit better although I know it is hard to see in the picture.  I stamped it on Naturals White card stock because I love the pigmentation of this paper, it looks fabulous with this stamp set! I used the Scalloped Oval Die Cut with my Big Shot to cut the oval and the Scalloped frame around the image. It fits perfectly inside there like it was made for it :-) The patterned paper is from the Frostwood Lodge Designer Series paper pack, also in the Holiday Mini and it has beautiful vintage pages that are perfect for all you holiday projects! I just love the woodgrain look of this paper - perfect for the tree, right?? The sentiment is also from the Christmas Lodge stamp set and is stamped in White CRAFT ink, then embossed using the white embossing powder because I really wanted it to stand out! I used my mat pack to add the textured border along the top and the bottom, and then I trimmed each end of the sentiment piece using the Designer Label punch! It is so fun to be able to use punches in lots of different ways, and I really love the design it leaves here on the edges! I then popped the whole sentiment piece up on dimensionals.  The ribbon is also from the mini and is Early Espresso Quilted ribbon - totally yummy ribbon!! It looks and feels rich!! Soooo pretty!! Lastly, I added some pearls to each scallop around the image - doesn't it look awesome??!! I love these pearls, they dress up every projects I used them for! This is a simple card, but very pretty, and would make a great Christmas card (hmmmm.....maybe I will use this one, lol!) If you like any of these products and would like them for your own, you can shop in my online store, or contact me and I will be happy to place your order for you! I had such a great time showing you all these wonderful projects using mini products - I hope you were inspired by at least one project that I shared!!Now, I am off to get ready for my downline meeting tonight - I just love seeing my gals, they are all so creative, sweet, and fun!! I hope you all have a fabulous day, and take time to create something!
Card Recipe:
Paper - Chery Cobbler, Early Espresso, Naturals White, Always Artichoke card stock, Frostwood Lodge Designer Series Paper
Inks - Always Artichoke and Whisper White CRAFT inks, Early Espresso classic ink, white gel pen
Stamps - Christmas Lodge
Tools - Big Shot, Scalloped Oval die, heat gun, clear and white embossing powder, Designer Label punch, Dimensionals
Accessories - Early Espresso Quilted ribbon, Basic Pearls

August 20, 2011

PRETTY FLOWERS MAKE ME SMILE

Good morning all!! WOW! We are having a gorgeous day today here - lots of sunshine and a nice, soft breeze - days like this make me happy :-)  I will be in the craft room most of the day though as I have two classes, two workshops, and club this weekend, lol! Nothing like getting it all in on one weekend! But, with us leaving here in the next week I had to fit it all in so I will be nice and busy - just the way I like it *wink* I wanted to share a card today that I made using our new stamp set called Fabulous Florets.  It is so very pretty and I just love the sentiment! I wanted to make a pretty spring/summer card because I am soooo ready for them, lol! I decided a Peach Parfait base would get me on the right track......was I right??  I love this color, so yummy! I embossed it using the Vintage Wallpaper embossing folder - loooove it! The images are stamped in Pear Pizazz and Marina Mist, and I added some Basic Black cardstock in there to give it some pop! The ribbon is the oh so fun Pear Pizazz twill ribbon.  The sentiment is awesome, isn't it? I just love this saying, it just makes me happy! Again, I added a small pop of black with the brads.  I love how this card turned out - simple but happy, right??!  That's what I am all about lately :-)  If you like what you see here and would like to have some of these products to be in YOUR crafty space, you can shop online with me or contact me and place an order that way! I know that I am lovin' everything in this new summer mini - I don't know how they do it, each one that comes out is better than the last, and I just have loved them all! Soooo, I am off to run a few errands and then back to the crafting table for me, lol! I have TONS of cardstock to cut, and one more design layout to do for my scrappy gals coming over this weekend! I just love my life :-) Take care, have a wonderful day, and happy stampin'!!!
Card Recipe:
Paper - Pear Pizazz, Peach Parfait, Basic Black cardstock
Inks - Marina Mist, Pear Pizazz classic inks
Stamps - Fabulous Florets
Tools - Ticket Corner Punch, Big Shot, Vintage Wallpaper embossing folder
Accessories - Pear Pizazz twill ribbon, black brads

April 18, 2011

YEEEEHAAAWWWWW!!!!

Well, good morning y'all!!! Here it is, a Monday morning, and I am still at home nursing my knee.....but, I am one step closer since I had the MRI on Friday.  Now, I am awaiting the assignment of a specialist to read the MRI and see what kind of treatment plan they recommend.  I will be honest - anything involving no surgery will sound good to me as I want to be mobile for my son's graduation at the end of May.  Meanwhile, I am still home from work, and resting the knee.  So, I thought I would share a workshop card I did last month! This was a special request design - my hostess really wanted something western themed so I pulled out my Out West stamp set and went to work! I love this set, it is sooo much fun to play with! I was glad I had an excuse to pull it back out and ink it up! I made this more of a male themed card since we card makers tend to focus on flowers and ribbons and pretties, lol! The base of this card is Early Espresso, which I ran through the Big Shot and embossed it with the Perfect Polka Dots embossing folder.  Then, using the Elegant Soiree designer paper, I die cut the Top Note shape and a large circle, using them as the background to my images.  The cowboy is stamped on Naturals Ivory card stock - perfect for a male western card! I also used my Big Shot for that circle - both of these circle dies can be found in the Occasions Mini!  I stamped the cowboy hat on the same card stock, but I cut it out and popped it up on a dimensional after stamping the sentiment on some Soft Suede card stock that has been punched out with the Designer Label punch.  I added some twine at the top of the card - no ribbon for this cowboy!! I am thrilled with how this turned out as was the hostess who informed me that she cannot part with this card so she keeps it up on her mantel so she can look at it all the time, lol!! I LOVE making my hostesses smile - it will never get old!!! If you like this cowboy set as much as we do, you can order it and everything else you see here in my online store or contact me to place an order! And, if you would like to hostess your own workshop and have me come and stamp with you and your friends, let me know so we can get you set up on the calendar! Now, I am off to relax my knee and catch up on some paperwork while I can - it is raining outside and the kiddos are on Spring Break so I am sure that once they get up this morning (teens can sleep FOREVER) they will want my attention, lol! I hope your Monday is going FABULOUS - I will be back to share something special tomorrow so until then, happy stampin'!
Card Recipe:
Paper - Early Espresso,Soft Suede,  Naturals Ivory card stock, Elegant Soiree Designer Paper
Inks - Early Espresso classic ink
Stamps - Out West
Tools - Big Shot, Perfect Polka Dots embossing folder, Top Note Die, 3 1/2 inch Circle Die, 3 inch Circle Die, Designer Label Punch
Accessories-  Twine

April 14, 2011

A DEAR FRIEND

Good Morning all!!! I am so happy - the sun is shining and no clouds in sight, lol! I am soooo very tired of all the rain....bring on the Spring! We still have the heater on....crazy! Today is MRI day - I am so glad because maybe now we can move forward with a plan to get my poor knee fixed......and get rid of the cane so my son can stop calling me granny, lol!  So, lots on the agenda today! I want to share a card with you that I made for a friend of mine whose father just took a very nasty fall off of a ladder  - he insists on picking the oranges off the tree although he is getting up there in age and really shouldn't! Sooo, I wanted to let her know I was thinking about her with a card!  I chose to use the Blessed Mother stamp set because I just love the flowers in this set - see, you don't have to just use it for Mother's day, lol! It is in the Occasions Mini and the images are just gorgeous! The background on this card is embossed using the Vintage Wallpaper folder and then heat embossed with Iridescent Ice (click on the image and make it larger so you can check it out).  It just sparkles and is soooooo pretty IRL! I kept is simple, and used a small strip of the Springtime Vintage patterned paper, focusing on the blues and greens this time - I just love this paper, can you tell?*wink*  I know, you probably are tired of seeing it, but I can't seem to stop using it, lol!  The sentiment is from the Hostess Level I set Silhouette Sentiments - love this set! If you want this set, all you have to do is host a workshop of $150 and it is YOURS! The images are gorgeous and it has great sentiments as well! To top this card off,  I added some Old Olive seam binding ribbon, which I love because is it so easy to use - it is so pliable you really can do a lot with it! I hope this card makes my friend smile - she is such a neat lady, I have really enjoyed getting to know her! Another fabulous benefit of being a demonstrator - I have met some really wonderful people!!! I am sure as paper crafters yourself, you know EXACTLY what I mean, right??  So, off to do some stamping before I go to the doctor! Thanks for all the sweet emails and comments, I love that you all think about me!  I will let you know what they have to say and whether surgery is in the cards for me......sheesh, I am ready for my knee to be normal again, lol!! Take care and have a wonderful day! I will be back tomorrow - until then, happy stampin'!!
Card Recipe:
Paper - Not Quite Navy, Old Olive, Whisper White card stock, Springtime Vintage Designer Series Paper
Inks - Not Quite Navy, Old Olive stampin write markers and classic ink pads
Stamps - Blessed Mother, Silhouette Sentiments
Tools - Big Shot, Vintage Wallpaper embossing folder, 2 3/8 inch Scallop Circle Punch, Small Oval punches, 1 3/8 inch Large Circle punch, Eyelet Border punch, 1 3/4 inch Circle Punch, Heat Tool
Accessories - Iridescent Ice embossing powder, Old Olive Seam binding ribbon, Basic Pearls

*STAMPIN HUGS* ALEX

April 13, 2011

A SPECIAL THANKS

Hi all! I know I have not been posting very regularly but as you know I am struggling with an injury to my knee and so I have not wanted to do too much but sit with it propped up, lol! I have however been doing some thank-you cards for special people who have been sending me sweet cards and checking in on me :-) It warms my heart to know I have such great friends!  And, my family has been wonderful too - Tony and the kids have really stepped it up to make sure that I am not up and walking around on my leg too much.  I am anxiously awaiting Thursday to get here so I can get the MRI and find out the extent of the damage. At least then I can figure out a plan to get life back to normal....whatever normal is LOL!  Sooo, the card!  I love how these colors go to together, they make me happy! They are Rose Red and Old Olive....just yummy!  That sweet patterned paper is from the Springtime Vintage series....I know I use it alot, I just LOVE it!! I have to say I definitely got my use out of it - and, if you like it, you better get it before the end of the month because it is in the Occasions Mini, which ends on April 30th.  That cute new frame that you see is one of our stamps in the set that you can get on special this month - check this link out for more information! All four stamps can be punched out using the Extra Large Designer Label punch, which just happens to be my favorite punch (well, today anyway, lol!) Just a $20 purchase allows you the opportunity to get the stamp set and some gorgeous paper that otherwise won't be available until the new catalog comes out! It's a great sneak peek if you want it  - and trust me, you do *wink*  The embossed piece of Whisper White was cut out using the Top Note Die and then run through the Big Shot with the Finial Press embossing folder - soooo pretty! Some gorgeous Rose Red Seam Binding Ribbon, a designer button, and done! I really hope this card makes my friend smile because she deserves it!! So, if you want anything you see her, get on over to my online store and order it quickly OR contact me and I can put the order in for you....but, don't wait to long because the Occasions Mini is going, going, gone at the end of the month :-)  So, I am now off to ice my knee and catch up some more on my reading - it has been kind of nice to have an excuse to sit in the recliner with a good book, lol!! I have several cards to share with you so I am going to be back tomorrow with another one for ya!! Until then, happy stampin'!!!
Card Recipe:
Paper - Pink Pirouette, Whisper White, Rose Red card stock, Springtime Vintage Designer Series Paper
Inks - Rose Red, Old Olive classic inks
Stamps - Four Frames, Silhouette Sentiments
Tools - Big Shot, Top Note Die, Finial Press embossing folder
Accessories - Designer button, linen thread, Rose Red seam binding ribbon

*STAMPIN HUGS* Alex

March 10, 2011

BLISS IS BLISS!!

Howdy all! Whew! It has been such a busy week so far, I cannot even believe it is already Thursday! I reallly like my new job though, and the people are great, which is always nice! I have gotten to stamp some too, which is always fun - I was worried that I would have less stamping time, but I think I have just gotten better at managing my time, lol! I had a wonderful workshop this week with some fun new friend so I wanted to show you a card that we made together.  We used the Sale-a-Bration set called Bliss and I have to say, I LOVE LOVE LOVE this set!!! It will no longer be available after the 31st of March, so if you have not gotten this one yet, you need to make sure you do - it's FREE with your $50 order - yep, I said FREE!!! Can't beat that :-)  We had such fun putting this card together! I shared the wonderful Vintage Wallpaper embossing folder using Early Espresso card stock  on a Crumb Cake  base.  Don't they look great together?!  Good enough to eat, *wink* The patterned paper is the Sweet and Sour Specialty series paper from the main catalog and is sooooo pretty! I really do like the diverse selections of patterned paper we have in this catalog - sooo much to choose from! We used the Eyelet Border punch to create the pretty borders, then added some Rose Red Seam Binding ribbon that can be found in the Occasions Mini.  Have I told you how much I love this ribbon? So easy to manipulate, I and the colors and texture are gorgeous!  The main image butterfly is stamped in Rose Red ink, then stamped over with the sentiment in Early Espresso.  After punching it out using the Designer Label punch, we ran it through the Big Shot using the Perfect Polka Dots embossing folder - love how it turned out! We mounted it on a Scalloped Circle of Marina Mist card stock that is stamped with the swirly stamp from the Bliss set - well, that's my name for it anyway, lol! Lastly, we added one of the gorgeous Vanilla Rosette flowers that can also be found in the Occasions Mini - you get three sizes of flowers in this fun set, and they reallly make a project pop! In the center, we added a rhinestone - every flower needs a little bling, don't you think?  The ladies loved it, and I sure enjoyed sharing it with them!  If you would like to make projects similar to this one with YOUR friends, contact me and we can set up your workshop! And, if you have to have these items right now, you can purchase them in my online store or email me your order and I will get your order in!  Now, I gotta run and get to work, but I hope you all have a wonderful day and find some time to stamp!
Card Recipe:
Paper - Crumb Cake, Early Espresso, Marina Mist, Very Vanilla card stock, Sweet and Sour Specialty paper
Inks - Marina Mist, Rose Red, Early Espresso classic inks
Stamps - Bliss from the Sale-a-Bration catalog
Tools - Extra large scallop circle punch, Exrra large designer label punch, Eyelet border punch, Big Shot, Vintage Wallpaper and Perfect Polka Dots embossing folders
Accessories - Rose Red Seam binding ribbon, Basic Rhinestones, Vanilla Rosettes    
   

March 8, 2011

BEAUTIFUL BLOSSOMS

Hi all!!! I know, I know, I missed a few days - cut me some slack, I now work a full-time job outside my house as well as run my stamping  business so this gal is BUSY, lol!!!! I have settled into somewhat of a routine - a busy one, but a routine, lol! I stamped all weekend and worked all week so I was a little tired - took one day off to just relax and clean the house, do laundry, etc. - I guess that is not all that relaxing though, heehee!  I had a wonderful workshop this weekend, meeting all kinds of new friends and I have to say, they were just the medicine I needed after a hard week at work! We laughed, stamped, played, and laughed some more - ahhhh, I just love it!! I wanted to share one of the cards we made using the Build a Blossom stamp set(clear item 121994) from the Occasions Mini.  This is such a fun set - and what makes it even more fun is the fact that it has a coordinating Blossoms Petal punch(item 121808) to go along with it!!! Too fun!!! Sure makes punching out all these petals and leaves a snap to do - loooove that:-) We used some of our purples on this card, which is not a color I reach for very often, but I have to say, I do like how they look together on this card! The base card is Elegant Eggplant card stock(item 105126) and the petals are stamped in the same but on Perfect Plum card stock(item 101889) .  Yummy, right? The flower is actually mounted on a piece of Whisper White card stock(item 100730) that has been embossed using the Framed Tulips embossing folder(item 121809) also found in the Occasions Mini.  Soooo pretty, I love how elegant it makes your cards!  The center of the flower has a Whisper White designer button(item 119743) with some linen thread threaded through - I just can't seem to get enough of my buttons lately! Add to that some oh so yummy Old Olive Taffeta ribbon(item 119256) and you have a WOW! of a card! At least I think so, LOL! And, so did the ladies at the workshop - this card was a definite favorite!! I have to tell you, workshops are the highlight of my business - I just love introducing stamping to new people, getting to spend time with some of my favorite customers, and best of all, meeting and making new friends! I had a happy surprise at this workshop as well - I got reconnected with a woman I went to a crop with my very first month after moving here from Jacksonville! She was my table mate and we had a great time with each other even though everyone else at that crop wasn't very nice - we had a few laughs about that at the workshop too :-)  If you would like to have a fun night with a bunch of your friends making some cards or a scrappy project, give me a holler - I would love to set a workshop up with you! And, if you have fallen in love with the products you see here for this card, you can order them in my online store or email me and I will be happy to put your order in for you! Now, I have to go to my other job but I WILL be back tomorrow with another fun project I shared with my new friends! Until then, happy stampin'!!!
Card Recipe:
Paper - Elegant Eggplant, Perfect Plum, Whisper White, Old Olive card stock
Inks - Elegant Eggplant, Old Olive class inks
Stamps - Build a Blossom, You're a Gem(sentiment)
Tools - Big Shot, Framed Tulips embossing folder, Blossoms Petal Punch, small oval punch
Accessories - Old Olive taffeta ribbon, designer buttons, basic rhinestones, linen thread

March 1, 2011

SENDING SOME LOVE

Hi all!! This will be a quick post as I need to get to work BUT I wanted to share a card I made for a friend who is going through a hard time right now - sometimes just telling someone you care is enough to make them smile! I know that getting happy mail for me is a great pick-me-up :-)  I used one of our fabulous hostess sets called Because I Care; I can't believe how beautiful that flower is!! And, you can earn this stamp set FREE just by hosting a workshop or placing a qualifying order of your own! I kept this card fairly simple:  the base of the card is Rich Razzleberry, then I took some Whisper White and ran it through the Big Shot using the Square Lattice embossing folder - doesn't add a wonderful texture to this card??!I think it really makes it pop!  I then stamped the flower by coloring in the petals with the Rich Razzleberry stampin' write marker, and the leaves and stem with the Old Olive stampin' write marker - love it!!! The sentiment is stamped in Rich Razzleberry ink on Old Olive card stock and then punched out using the Designer Label punch, which is adhered using dimensionals.  For the final touches, some Old Olive taffeta ribbon and a mini pearl did the trick - just the right amount of elegance to finish it off! I hope she likes it - everyone deserves a little bit of happiness in their mailbox :-)  I have to say, it is one of the most wonderful parts of card making for me: I love to know that I can brighten someones day by something I made with my own hands!!! If you like any of the items you see here, you can order them in my online store or email me your order and I will be happy to order it for you! Also, March is the last month for Sale-a-Bration items: just a $50 order will earn you free stuff.....and, who doesn't love free??!!!  But, you need to take advantage of this now because it will be gone before you know it!!! Now, I have to get going and head out for another day of work - yesterday was a very busy and interesting day, I think I am going to like it!! But, I also love the fact that I have this wonderful job of stamping and scrapbooking, so I do look forward to coming home and playing *wink*  I will be back with something fun to share tomorrow so until then, happy stampin'!
Card Recipe:
Paper - Rich Razzleberry, Old Olive, Whisper White card stock
Inks - Rich Razzleberry, Old Olive classic inks and stampin' write markers
Stamps - Because I Care
Tools - Big Shot, Square Lattice embossing folder, Designer Label punch
Accessories - Old Olive taffeta ribbon, basic pearls

February 23, 2011

A LITTLE BIT OF SUNSHINE

Good morning all! Well, it has been one very busy long weekend here - kids out of school, and lots of things going on, so no posting time for me!! I have been stamping though, so I have plenty to share :-) It has been raining and storming here a lot lately so I wanted to make something bright and cheery that reminded me of the sun!  The stamp set Bold Blossom(clear item 122232) in the Occasions Mini fit the bill perfectly, so I inked it up and this is what I came up with! And, it is a $10 stamp set - who can go wrong with that??!!  I chose Pear Pizazz(item 119795) and Peach Parfait card stock(item 119794) as my base colors - love this combo! Both of these are part of the in-color family, and they just remind me of Spring and Summer, both of which could get here anytime now, lol!  I ran the Peach Parfait through my Big Shot using the Perfect Polka Dots embossing folder(117335), doesn't it look purdy??  The pattern paper is from the Sunny Garden(item 119831) collection, found in the main catty, which I punched with the Eyelet Border punch(item 119853).  Love all the bright, fun colors of this paper!  When I stamped the main image, I added some Daffodil Delight - that bright, fun yellow was just what this card needed to give it some pop! Sooo, I used it for my sentiment and ribbon treatment as well, lol! The actual sentiment itself is stamped in Peach Parfait classic ink(item 119783) and then I punched it out with the Scalloped Oval Extra-Large punch(item 119856) and popped it up on dimensionals.  Simple card, but it makes me smile with all the bright fun colors and images so I think I will send this one to my mom to brighten her day! I love sending handmade cards to people - to hear them tell me how excited they were warms my heart - everyone loves happy mail!!! If you would like to order any of the items you see here today, you can do so in my online store or email me your order and I will be happy to submit it for you!!  And, don't forget:  you can still take advantage of Sale-a-Bration:  for each and every $50 order, you get to choose something for FREE, whoohooo! I love FREE, don't you??  So, today I am doing some more stamping and then I have to run out and buy some boots because we are going to Reno this weekend and it is snowing there! ACK! Bring on the Spring, I tell ya!!!  I am sooooo tired of winter already!  I hope all of you are staying warm and fitting some stamping into your day - I will be back with another fun card to show you tomorrow, but until then, happy stampin'!!
Card Recipe:
Paper - Pear Pizazz, Peach Parfait, Daffodil Delight, Whisper White card stock, Sunny Garden Designer Series Paper
Inks - Pear Pizazz, Peach Parfait, Daffodil Delight classic inks and stampin' write markers
Stamps - Bold Blossom
Tools - Big Shot, Perfect Polka Dots embossing folder, Scalloped Oval punch, Eyelet Border punch, Ticket Corner punch
Accessories - Daffodil Delight 1./8 inch taffeta ribbon, basic rhinestones

February 18, 2011

PURE BLISS

Happy Friday all!! WOW! This has been a long week.....and I have so much still to get done, LOL! All it has done is storm here, and it has been really really COLD!!!  So, of course I have managed to catch a bad cold, which makes me want to do nothing but lie around with a blanket and do nothing.  This does not make for a very productive week,uggghhhhh........so, lots to get done today! But first, I wanted to share this card I made for the love of my life! I know I am really lucky - he is such a wonderful man, and treats me like a Queen so I wanted to give hm a card for no reason other than letting him know I love and appreciate him!  So, I got out my Bliss stamp set(clear item 123217) that I got FREE from the Sale-a-Bration catty - can you believe how beautiful this FREE set is?? - and went to work!  I just love all the pretty stamps in this set - it is an amazing stamp set, I seem to want to stamp with it all the time lately! I stamped my base card with the little flower in Not Quite Navy ink and then paired the card stock with the Spring Vintage patterned paper(item 121782) from the Occasions mini - this is also one I used again and again, I just adore all the beautiful colors and designs in this pack!  The image is stamped on Very Vanilla card stock(item 101650) - first, I stamped the butterflies and flowers in Baha Breeze ink(item 111833) and then stamped right over that butterfly with my sentiment in Always Artichoke ink(item 105219).  Then, I ran the whole piece through my Big Shot(item 113439) using the Perfect Polka Dots embossing folder(item117335) .  Pretty, right??!!  I layered it on a piece of Baha Breeze and Always Artichoke card stock that I distressed with my distresser tool that is actually part of the cutter kit(item 106958), an amazing tool you NEED to have, then inked the edges of all three pieces.  I then stamped that little flower in Not Quite Navy, Always Artichoke,and Baha Breeze, cute them out, and popped them up on dimensionals, adding some rhinestones to give it some pop! And, since I did not want those flowers stamped on the base card to be ignored, I added pearls to those, lol!  I topped of this card with some yummy Marina Mist Satin ribbon(item 119751), sooooo pretty!!!!  I really had fun with this one because I knew I was going to give it to my love so I wanted it to be really purdiful :-)  I am giving it to him tonight - I hope he likes it!!! If you like any (or all, heehee) of the items you see here, you can order them from my online store or shoot me an email and I will be happy to place your order.  And, don't forget: with each and every $50 order, you get to pick something FREE from the SAB catalog, something like the Bliss set that you see here! I hope you all have a fabulous weekend - stay warm and dry, as I will be doing here, lol! And, find some time to stamp - I know I am going to *wink*
Card Recipe:
Paper - Not Quite Navy, Always Artichoke, Baha Breeze, Very Vanilla card stock, Springtime Vintage designer series paper
Inks - Not Quite Navy,. Always Artichoke, Baha Breeze classic inks
Stamps - Bliss
Tools - Scalloped Trim border punch, Big Shot, Perfect Polka Dots embossing folder,cutter kit
Accessories - Basic Pearls, Basic Rhinestones, Marina Mist satin ribbon