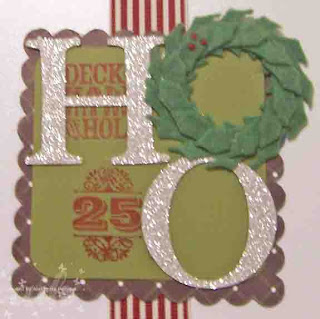
Here is the first square! Sorry for the pic being a bit blurry - I don't know what is wrong with my picture taking abilities lately :-( Each one of the squares has a solid Old Olive square that is cut out using the Square Die for the Big Shot, rounding the corners with the Corner Rounder punch. We then stamped on this square in Cherry Cobbler ink with the fun stamp set called Merry and Type. Such a cute stamp set, love it! The letters were cut out using the Serif Essentials large letter dies for the Big Shot, using both Chipboard and the Silver Glitter paper. It gives the whole hanging a wonderful dimensional look without adding a ton of bulk to it. I did not want it to be too heavy as it does need to hang up and then fold away nicely to be used again and again! That pretty felt wreath is from our Felt Flurries pack that can be found in the Holiday mini - you get a lot of bang for your buck with this package since you get sooo many of each fun little holiday embellishment!
This is the second square on the hanging, which as the same solid square as the first one, along with the same letters for the sentiment! The stamp set that we used on this one is called Snow Much Fun and I have to say I thoroughly enjoy stamping with this fun set - the two snowman images totally make me smile! There is a short, fat snowman in this set as well, and the sentiments are just as cute as can be! For this square, we used the tall snowman and his birdie friends as well as the little snowball with the birdie on it - aren't they adorable?? They are both stamped in Cherry Cobbler ink as well. The holly leaves and the sweet little mittens are more of the cute felt flurries embellishments from the package - those mittens are just sooooo stinkin' cute! They actually come attached with a piece of string between them, just like we all had when we were little, lol! We just cut them off for this project, but they look just as cute strung together!
This is the third and final square on the hanging, again with the same solid square and the pretty lettering. The stamp is from the Merry and Type stamp set and is actually a pretty large stamp - we could not even get the whole stamp on here, cutting off some of the strings hanging down with the ornaments! I love this stamp, I think it is bold and really catches the eye! It is also stamped in Cherry Cobbler ink. We used even more of the felt flurries embellishments, adding in the really fun snowflake this time - I just love these!!! This was such a fun project to put together, and many of the ladies who attended told me this was their favorite of the four that we did! I have to say, I had a ton of fun designing this one too :-) If you would like to order any of the products you see here, you can order them in my online store or you can contact me directly, and I would be happy to place your order for you! Or, if you would like to book a workshop and make your very own fun projects with your friends, contact me and let's get you all set up! Now I am off to finish prepping for my fun workshop later on this afternoon - I hope all of you can find time to stamp in this busy time of year, I believe it is so good for the soul, and much cheaper than paying for therapy, lol!! Have a wonderful day, and I will be back tomorrow to share some super cute tree ornament gift card holders!
Wall Hanging Recipe:
Paper - Old Olive card stock, Letters to Santa Designer Series paper, Silver Glitter paper
Inks - Cherry Cobbler classic ink
Stamps - Merry and Type, Snow Much Fun
Tools - Big Shot, Serif Essentials Large Letter Dies, Scallop Square Die, Square Die, Sticky Tape
Accessories - Cherry Cobbler wide grosgrain ribbon, Felt Flurries embellishments


